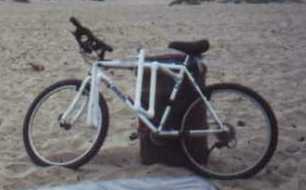
My favorite break is about a mile
from the nearest parking,
but is very accessible by bicycle.
I felt uncomfortable
riding the bike while carrying
my board under my arm. I decided
that I needed some sort of rack.
So I looked around the web
and various surfshops in SoCal.
The options I found were
all too expensive, ranging from
$90-130. Instead, I opted for
spending $12 at the hardware store,
and about 30 minutes of time
to build this beauty. It
is simple, cheap and works very well.
I made this in Sept. of 1999 and
it is still holding up.
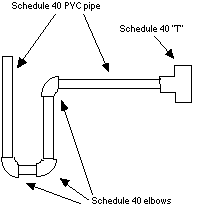
1" Schedule 40 PVC Pipe (1): $1:18
1" Schedule 40 PVC Elbow (6): $0.53 each
1" Schedule 40 PVC Tee (2): $0.58 each
Hose Clamps (4): $0.94 each
PVC Glue (Low VOC): $2.12
Pipe Insulation 3/8" for 1" copper pipe (1): $1.85
Bungee Cords (2): $1 each
(*Prices reflect costs at the HomeDepot in Corona,CA on Aug
1, 2000)
Hacksaw for cutting PVC
Screwdriver to tighten hose clamps
Drill
Instructions:
1) Make sure that you have a place on your bike
to mount BOTH
parts of the rack. Mine is mounted on the
seat tube, just under
the top tube, and on the down tube just behind the head
tube;
but they could be mounted on either end of the top tube.
Check where your cables are, and plan on mounting them
where
the cables are not. (Actually, my front derailleur cable
runs down
the seat tube, but the rack does not interfere with it.)
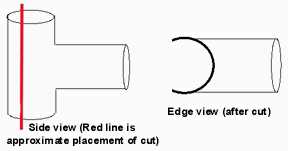
Using a hacksaw, cut about 1/3 to 3/8 of the circumference
out of
the top part of your PVC Tees. See diagram below:
2) Snap the Tee onto the frame to make sure
that it fits around the
tubes without too much wobble.
If it is too loose, use shims
made from old inner tubes. If
it is too tight, cut more of the
Tee away with the hack saw.
If you have to cut more than half
the circumference away, then it will
not stay on by itself; that's
OK, the hose clamps will take care
of that.
(Warning
: this may scratch the paint on your bike, But if you
are concerned
about scratches on a MTB, you have no business
owning one.
Sell the bike immediately, take the cash and head
directly to
the nearest RonJons and buy yourself a new outfit;
you deserve
it!)
3) Once the Tees are on the
bike where you want them, measure
the distance
from the stop inside the Tee to the outside edge of
your pedals
(going straight out, rather than toward the pedals).
Add two inches.
This will be the length of the PVC tubes that
go out horizontally.
Cut two of these pieces. insert these pieces
into the Tees.
4) Measure the distance from
the bottom of the pipes to the ground
for each, and
calculate the difference. Lets assume that this value
is 3/4".
Now measure the width of your board, divide this value
in half and
add three to four inches. This is the length of the
inside vertical
tubes, making sure that you cut them 3/4" different
in length.
Add an elbow to the end of each horizontal tube, and
then put the
vertical tubes into the elbow. Measure the distance
to the ground
from the bottom of each tube. They should be close.
Exact is not
necessary. If the difference is significant, use the
hacksaw to make
the appropriate adjustments. Add elbows to
each vertical
tube.
5) Measure the thickness of
your board and add 1" to 1.5". This will
be the distance
between the two vertical tubes. Cut two pieces of
pipe to this
length and insert in to the elbows. Add elbows to the
ends of these.
6) Cut two more pieces of
pipe that are 2 to 3 inches longer than the
previous vertical
tubes and insert them into the elbows. Your rack
is virtually
done; BUT DON'T put your board in it just yet;
The Tees must
be properly clamped, and all the joints must be glued.
Remove the whole
thing from the bike, leaving the Tees on
the bike!
Start gluing the joints, making sure that all pieces lie
in a single
plane. I did this by laying it flat on the garage floor
while glueing,
but you can get fancy if you want with laser guided
alignment equipment,
if you like. Once the glue has set, glue the
horizontal tubes
into the Tees while they are on the bike, making
sure that both
racks stick out perpendicular to the bike frame, and
the vertical
tubes are perpendicular to the ground.
7) Use hose clamps to secure
the Tees to the frame (2 per Tee).
8) Drill a hole in each of
the outside vertical tubes about 1/2" from
the top.
This will serve as an attachment point for the bungee cords.
9) Place the "3/8 inch pipe insulation
for 1 inch copper pipes" around
both vertical
tubes, and the short horizontal tube at the bottom of
each rack.
This will keep your board from getting dinged and
scratched by
the rack. (If you noticed, I don't have the insulation
on my rack,
this is because I always transport my board in my
travel bag,
which is pretty well padded anyway, so dings and
scratches from
the rack are not a concern).
10) Save any leftover PVC or insulation.
You can make a very
nice home
storage rack for your board with this material.
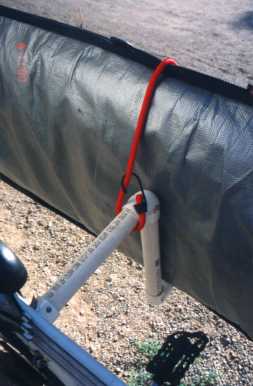
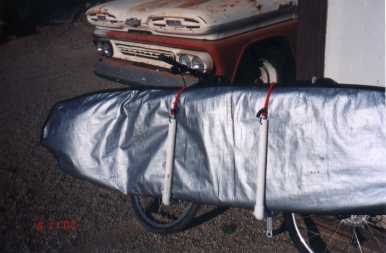
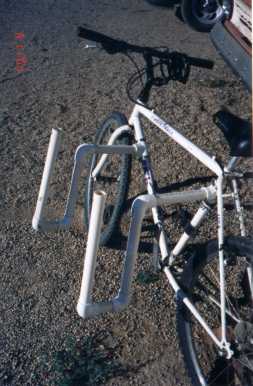
PVC Construction inspired by BurningMan
Feel free to email
me for technical questions or comments regarding this page.
Thank You for stopping by!
Copyright 2000-2006 John L. Hermesman |


